Moisture and Acclimation
Skipping slab moisture testing or acclimating material in a garage instead of the installation room can lead to cupping, swollen laminate cores, or separated vinyl plank joints.
Phoenix Expert Flooring explains that the most common floor installation mistakes happen before or during installation: skipped moisture testing and acclimation, uneven subfloors, incompatible adhesives or underlayments, incorrect fastener spacing, and missing expansion gaps. Phoenix heat, dry indoor air, and monsoon humidity can expose these errors quickly through buckling, gaps, squeaks, cracked tile, or lifting seams.
Skipping slab moisture testing or acclimating material in a garage instead of the installation room can lead to cupping, swollen laminate cores, or separated vinyl plank joints.
Dips, dust, cracks, moisture, and incompatible adhesive or underlayment can create hollow tile, telegraphing, delamination, seam peaking, and premature wear.
Undersized perimeter gaps trap seasonal movement, while ignoring a 6-8-inch fastener schedule on strip flooring can cause squeaks, loose boards, split tongues, or warranty problems.
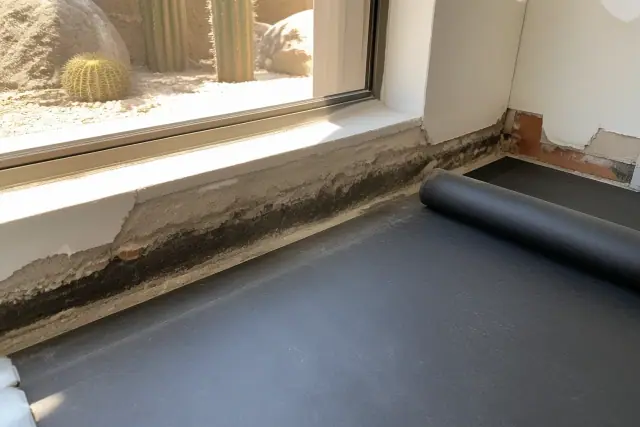
Cupped wood, a swollen laminate core, or a separating vinyl joint at a slab edge can indicate that vapor reached the flooring. Moisture testing and a compatible barrier help prevent this damage before installation.
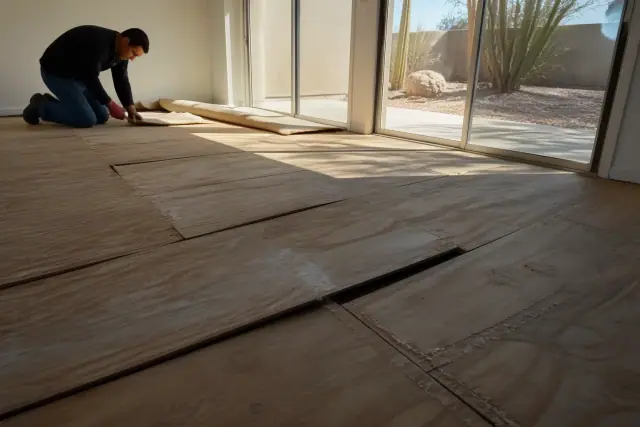
A 10-foot straightedge can reveal a dip greater than the commonly required 3/16 inch. That unevenness can produce hollow spots, plank flex, cracked tile, and wear at high points.
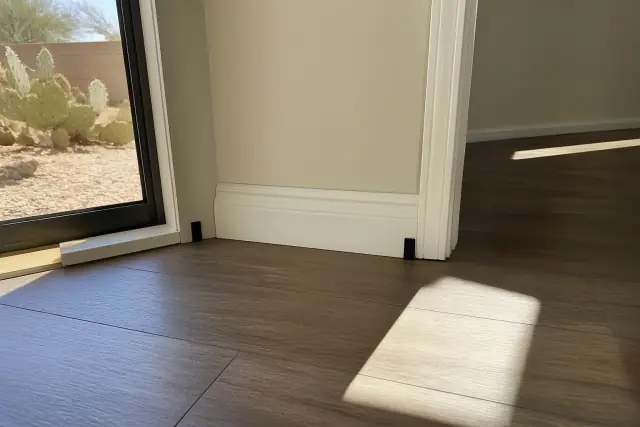
The open perimeter space hidden by baseboard or trim should continue around fixed cabinetry and transitions. This spacing allows wood and laminate to move without buckling.
For concrete slabs, document moisture conditions with an appropriate method such as an in-situ relative humidity test under ASTM F2170, then match the sealer, vapor retarder, adhesive, and underlayment to the reading.
Tile needs a rigid, flat substrate and proper thin-set coverage; glue-down vinyl needs an adhesive suited to slab moisture; carpet needs the right pad density and power stretching; and engineered hardwood is generally more suitable than solid stock over Valley slabs.
Level dips, clean the substrate, and address slab movement before flooring goes down. Rushing tile over movement joints can produce cracked grout within a year or two, while using sanded grout in joints under 1/8 inch can also cause cracking.
Generic construction adhesive is not a substitute for the flooring-rated urethane specified for a product, and carpet padding is too soft for laminate locking systems. Follow the specified adhesive, underlayment thickness and density, fasteners, and click angle.
| Visible Problem | Likely Installation Error | What to Check |
|---|---|---|
| Cupping or swollen cores | Slab moisture or a missing vapor barrier | Moisture readings and barrier compatibility |
| Hollow spots, lippage, or cracked grout | Uneven substrate or poor thin-set coverage | Flatness, crack isolation, and coverage |
| Buckling or seasonal gaps | Skipped acclimation or undersized expansion gaps | Room conditions, acclimation time, and perimeter space |
| Squeaks or moving boards | Wrong fastener schedule or damaged locking tabs | Fastener spacing and joint condition |
| Lifting seams or bubbles | Incompatible adhesive, trapped moisture, or a dirty slab | Adhesive specification and surface preparation |
A floor installation mistake is a departure from the manufacturer's preparation, layout, fastening, or environmental requirements that shortens service life. In the Phoenix metro, dry summer air and monsoon moisture swings can make movement and adhesion errors appear sooner; wrong fastener spacing or adhesive selection may show up as squeaks, delamination, or wear within 1-3 years. Many failures combine causes, such as slab moisture plus a missing expansion gap, so repairing only the visible symptom may not solve the problem.
Material, subfloor, room size, traffic, and conditioning determine which installation errors matter most. A slab-on-grade home in Ahwatukee has different moisture concerns than a raised wood-frame home near the Arcadia foothills, while downtown Phoenix commercial floors need wear layers and adhesives rated for heavy foot traffic and rolling loads. An unconditioned property in mid-July creates a different acclimation risk than an occupied room, and epoxy over a damp or unground slab can bubble or delaminate within months.
For plank layout, the Rule of 3 means staggering adjacent end joints by roughly 6-8 inches and blending boards from at least three boxes; seams closer than 6 inches can create weak, repetitive patterns. Simple floating floors in small, low-moisture rooms may suit experienced DIY work, but tile, glue-down flooring, concrete slabs, structural leveling, warranty-sensitive jobs, and rooms larger than a few hundred square feet benefit from professional testing and installation. Phoenix hardwood installation generally runs $6-$25 per square foot, while low-bid labor may be advertised at $1.50-$3 per square foot; failed-floor repairs involving releveling or water-damaged sections can reach $300 or more per linear foot depending on severity. For direct slab contact or strong sun exposure, engineered hardwood, tile, and luxury vinyl plank generally handle local conditions better than solid hardwood or low-grade laminate.
For a Phoenix flooring project involving a concrete slab, moisture testing, structural leveling, tile, glue-down material, or manufacturer warranty requirements, request an in-home moisture and flatness assessment. A documented evaluation can identify preparation and material needs before installation begins.